

Paying for government documents like the NBI Clearance has become incredibly easy, and GCash is one of the most convenient options available. If you have a GCash account, you can settle your NBI payment in seconds right from your phone.
This guide provides a complete, up-to-date breakdown of the process to ensure your payment is fast, secure, and successful.
What You’ll Need Before You Start (Prerequisites)
Make sure you have these three things ready:
- A Fully Verified GCash Account: Your account must be KYC-verified to access payment services.
- Sufficient GCash Funds: You’ll need at least
₱155.00(₱130for the clearance +₱25for the online service fee). - An NBI Application Reference Number: You must first register on the NBI website to get this number.
How to Pay NBI with GCash: A Step-by-Step Guide
The modern payment process is integrated directly into the NBI website. You do not need to use the “Pay Bills” feature in your GCash app. Follow these steps.
Step 1: Get Your Reference Number on the NBI Portal
- Go to the official NBI Clearance website:
https://clearance.nbi.gov.ph/ - Register for an account or log in.
- Fill out your personal information and schedule an appointment at your preferred NBI branch.
- When you proceed, you will be taken to the payment section. This is where you will get your NBI Reference Number. Keep this number handy.
Step 2: Select “GCash” on the NBI Payment Page
- On the NBI payment page, you will see a list of payment options.
- Select “E-Wallet” and then choose “GCash” from the list of providers.

Step 3: Complete the Payment in the GCash App
- After selecting GCash, the NBI portal will generate a payment request. You will be prompted to enter your GCash-registered mobile number.
- Log in to your GCash account securely by entering the MPIN or using your biometrics.
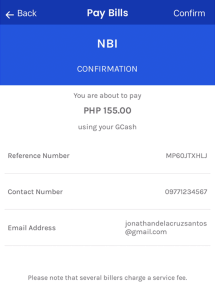
- A screen will appear inside the GCash interface showing the merchant (NBI), the amount (
₱155.00), and asking for your confirmation. - Tap “Pay” or “Confirm” to authorize the transaction. You will receive a payment confirmation screen in the app and via SMS.
Step 4: Verify Your “Paid” Status on the NBI Portal
- Go back to the NBI Clearance website and log in to your account.
- Navigate to the “Transactions” page.
- Check the status of your application. It should now be updated from “Pending” to “Paid.” This can take a few minutes to reflect.
Troubleshooting Common Payment Issues
Don’t panic. First, check your GCash transaction history to confirm the money was deducted. Sometimes there are delays between GCash and the NBI portal. Wait for an hour. If it’s still pending, contact NBI support with a screenshot of your GCash receipt. Do not pay again.
Simply go back to your NBI transaction history on their website and try the payment process again. A new payment request will be generated. Your reference number remains the same until it is paid.
This can happen if the payment gateway is undergoing maintenance. You can either wait for a few hours and try again, or choose another payment method like Maya or 7-Eleven.
Conclusion
Using GCash is a fast, secure, and highly efficient way to pay for your NBI Clearance. By following this updated, step-by-step guide, you can avoid confusion and complete your payment smoothly, getting you one step closer to your scheduled appointment.
Add Comment